⚠️ You need to be logged in to your Outplayed account to access Outplayed.
Recording will continue even while you’re logged out.
Take me to...
- How to create an Outplayed account
- How to Enable your Game
- Outplayed Capture Modes
- Why is Outplayed capturing my full session even though I set it to Highlights/Full Match?
- Outplayed is set to Full Session Capture Mode but is capturing the recordings as matches and misc.?
- Why doesn't Outplayed support recording a certain game event/Highlights Capture Mode/Full Match Capture Mode for my game?
- How to manually capture the game
- How to view and change your Outplayed hotkeys
- Do I have to be logged in to my Overwolf account in order to use Outplayed?
- How do I know that Outplayed is working?
- How to remove the Outplayed watermark from clips
- How to use the Screen recorder feature
- Screen Recorder is showing that there is already a recording in process
- Changing the Screen recorder settings
- How to record your webcam
- How to use virtual webcams with Outplayed
- How to use the Supercut feature
- How to capture only game sound
- In-game voice chat missing from recordings
- Audio not playing when viewed outside of Outplayed
- How to force microphone capture to mono
- How to set up Wave Link Stream (Elgato Wave) in Outplayed
- What is the Game dashboard (Secondary screen) and how to disable it
- What is Captured Events notification and how to disable it
- What is Discord rich presence and how to disable it
- What are “Before duration” and “After duration”
- How to change the duration of your highlights
- What is a bookmark?
- How to change the recording names
- Where to find the video files
- How to Backup and Restore your Outplayed recordings
- How to set up the Media folder
- How to change the Media folder location
- What are the recommended recording settings?
- Minimum recording requirements
- Encoders supported by Outplayed
- How to delete clips
- How to restore recently deleted clips
- How to stop Outplayed recording a certain game
- Help! Outplayed isn’t working
How to create an Outplayed account
An Overwolf account is required in order to use Outplayed.
In order to log in to the account please click on the Single Sign On option (SSO) or enter the email address and password used when creating your account:

Please note that clicking on a new SSO may open a new Overwolf account.
If you encounter any issue logging in to your account please open a support ticket.
How to Enable your Game
open the Outplayed settings and press on the Games tab, once you have added your game you can press on your game to set a Capture mode:
Outplayed Capture Modes
Note: Make sure to relaunch Outplayed & your game to save changes!
Outplayed has 4 different capture modes:
Highlights- Outplayed will automatically detect game events and create highlight clips for those events. You can select which game events will be automatically captured.

Full Match- Outplayed will start to capture the moment you start your match until the match ends. You can select which game events will be automatically bookmarked.

The recording will only record the match itself. The rest of the game will show as a Misc. recording.
Full Session- Outplayed will start to capture the moment you start the game process until you exit the game process. You can select which game events will be automatically bookmarked.

A full session video will be created for your entire gameplay session once you have closed the game process.
Note: If the game events are available, Full Session recording will be automatically split according to each match and the time between the matches will be marked as misc. You can change this setting by clicking on the scissors icon:


Manual capture- allows you to manually select when to record.
Click here for instructions on how to change the recording hotkeys.

Note: When using the Outplayed Capture Modes you can only record one game process at a time. Opening a new/different game process will stop the previous recording.
If you would like to record more then one game process at the same time please use the Outplayed Screen Recorder instead using the steps Here.
Why is Outplayed capturing my full session even though I set it to Highlights/Full Match?
The Highlights/Full Match capture mode depend on game events. When game events are down Outplayed will automatically switch to recording the full session so you won't miss out :)
Please note that when game events are down Outplayed will not be able to automatically add bookmarks.
For more information, please visit the following article: Apps and Highlights Status Explanation.
Outplayed is set to Full Session Capture Mode but is capturing the recordings as matches and misc.?
If the game events are available (Meaning the Highlights and Full Match options are available.) Full Session recording will automatically be split according to each match and the time between the matches will be marked as Misc.
You can check if this feature is enabled here under the game settings:

You can edit the clips together using the Outplayed Editor.
If you do not want the Full Session recording to be split according to matches click on the setting to disable it then relaunch Outplayed & your game to save the settings for future recordings:

Why doesn't Outplayed support recording a certain game event/Highlights Capture Mode/Full Match Capture Mode for my game?

Outplayed uses the Overwolf platform to detect in game events in real time. Supporting real time events for a game requires constant maintenance in addition to permissions from the game developers- so only selected games are added.
You can request supporting events for games Here.
Please search if there are any similar suggestions already before submitting a new one.
How to manually capture the game
Outplayed allows you to manually record any supported game.
You can start the recording by pressing on your recording hotkeys. The default hotkeys are as follows:

How to view and change your Outplayed hotkeys
Note: Make sure that your keyboard is set to English.
You can check which hotkeys you have set for different actions by going to the game settings in Outplayed:

You can change your hotkeys from the default set by Outplayed by clicking on the existing hotkey combination and pressing the combination of your choice:

Once you have set up the hotkeys for one game you can click on "Apply globally to all games" to sync the hotkey for all games on Outplayed:

Note: We recommend not using the number pad keys as hotkeys as the number lock may cause issues with the hotkeys.
Click here for our guide on How to Manage Your Overwolf Hotkeys
Do I have to be logged in to my Overwolf account in order to use Outplayed?
You may have encountered this message when opening Outplayed:

We recommend creating/logging in to your free Overwolf account when using Outplayed in order to unlock the Outplayed Core plan.
The Outplayed Core Plan allows you to do everything the Essentials plan can do PLUS:
- Hosting uploads to Outplayed.tv for 6 months instead of 3.
- Remove the watermark from Outplayed clips:

You can find information on the Outplayed Core plan here.
If you do not wish to open an Overwolf account or log in to your existing Overwolf account you can click on "Skip for now" to continue using Outplayed on the Essentials plan.
How do I know that Outplayed is working?
When starting your game Outplayed will show a notification that is is active:

When starting a manual recording the following notification will appear:

You can set Outplayed to not display these notifications in the Notification settings:
You can set Outplayed to not record these notifications in the Capture settings:

What is Captured Events notification and how to disable it
How to remove the Outplayed watermark from clips
Note: The watermark can not be removed from clips retroactively after they have been recorded with the watermark.
In order to remove the Outplayed watermark from your clips please go to the Outplayed Capture settings and deselect the "Add watermark to captured media" setting:

Make sure to fully relaunch Outplayed to save your settings!
Note: The watermark can not be removed from clips retroactively after they have been recorded with the watermark.
If you would like to change or fully remove the watermark from all future Outplayed recordings including exported Outplayed Editor projects please consider subscribing to Outplayed premium!
How to use the Screen recorder feature
If you would like to record a game which is not supported by Overwolf, or just record your computer screen, you can use the Outplayed Screen recorder feature!
Note: that if you are trying to record a game that is already supported by the Outplayed Capture Modes you will need to manually disable your game from being recorded with the automatic Capture Modes.
Please note that this feature can only be set to record manually and can not record automatic highlights & display game events.
You can start the screen recording by:
- Clicking on the Screen recorder option in the top bar then clicking on the big red button to start the recording:

- Right clicking on the Outplayed tray icon and clicking "Start screen recording"

- Going to the Outplayed Settings, clicking on Screen recorder and "Open screen record":

Please note that the recording will not end automatically when closing Outplayed- you can only end the recording manually.
Longer recordings may take a longer time to process. Please make sure to leave Outplayed open until the recording has been completely processed, closing Outplayed before the recording has finished processing may corrupt the file.

We are working on creating a hotkey to allow you to open the Screen Recorder faster!
Note: The Screen recorder will record EVERYTHING on the screen so make sure to hide any sensitive information.
Screen Recorder is showing that there is already a recording in process

If you start manually recording your screen and switch to a supported game Outplayed will stop the Screen recorder and automatically capture the gameplay with your chosen game capture mode settings.
If you would like to only use the Screen recorder to manually record your game please manually disable your game from being recorded.

Note: The Screen recorder will record EVERYTHING on the screen so make sure to hide any sensitive information.
Changing the Screen recorder settings
If you have more then one monitor you can use the Screen recorder settings to set which display will be captured:

Please make sure to restart Outplayed & your game to save any changes to the settings.
How to record your webcam
To record your webcam along with the gameplay you will need to go to the Outplayed Capture settings and enabled the Webcam:

Then under Device select your webcam device.
Under the "Webcam is captured" setting selecting "Always" means that the webcam will be recorded even when hidden, to allow you to play without interruption. Just set the window and when you're good to go press the hotkey to hide it.
Note: This is only supported on DX11
"Only when visible" means that the webcam will not be recorded when the webcam window is hidden.
When the webcam window is open in game you can change the location of the window by clicking and moving the window and change the size of the webcam window:
In memory of May 13.10.23 <3
Note: This feature is only supported when recording games using the Capture Modes and not supported for Outplayed games with no in-games overlay support.
How to use virtual webcams with Outplayed
Note: Outplayed does not support streaming at this time.
If you are trying to record a virtual webcam please make sure that it is fully enabled before starting your game.
For example - In order to use Vtube Studio while recording with Outplayed please make sure that your avatar appears correctly while in OBS Studio. Then set the Outplayed webcam settings to "OBS Virtual Camera" and your avatar should appear after clicking on "Start Virtual Camera" in OBS:

Outplayed does not fully support virtual webcams such as OBS Studio, NVIDIA Broadcast and others. They may work in the preview however we are unable to provide further support regarding virtual cameras.
How to use the Supercut feature
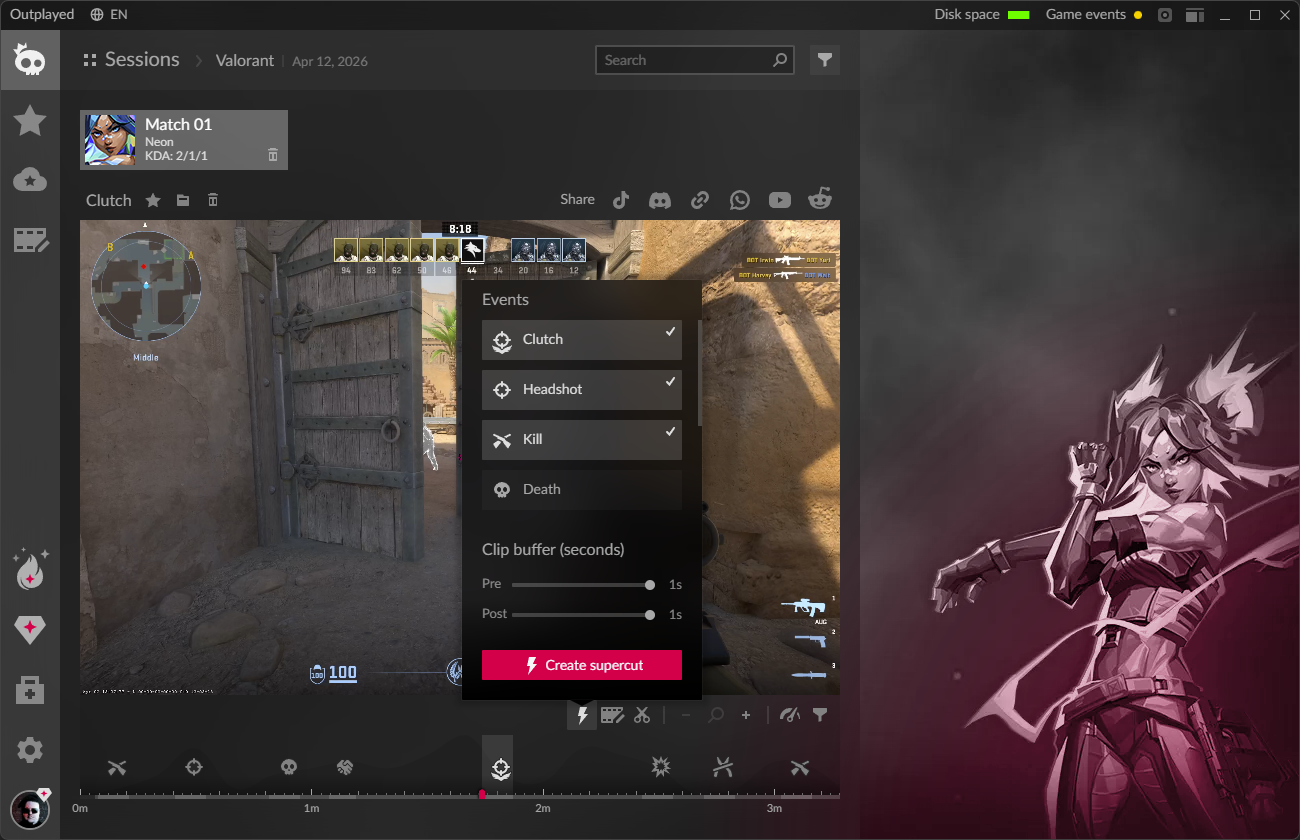
The Supercut feature lets you combine your best highlights from a match into one video automatically.
- Open the Sessions tab and select a match.
- Click the lightning bolt (⚡) icon in the toolbar below the video or the keyboard shortcut Ctrl+M:

- Under Events, select the game events you want to include (e.g. Kill, Death, Assist, Clutch, Headshot). Checked events will be included in the Supercut.
- Use the Clip buffer sliders to set how many seconds before (Pre) and after (Post) each event to include in each clip.
- Click Create Supercut.
Once the Supercut is created, it will appear as a separate item in the Sessions tab alongside the original match recording. A "Supercut created!" notification will appear at the bottom of the screen.
Click View & Share to review or share it.
Note: At least one event must be selected to create a Supercut. If no events are selected, you will see the message: "Select events to create Supercut."
How to capture only game sound
Outplayed can be set to capture only the game sound. Using this setting means that your music, voice chat, or any other non-game sounds will not be recorded.
You can find the "System sound captures only the game" setting in the Outplayed Capture settings under the Audio Advanced options:

Please note that this setting is in beta and will not work if you are using a Windows version older then Windows 10 2004 (released 2020-05-27) or Outplayed games with no in-games overlay support.
Note: When this setting is enabled it is not possible to record the Valorant voice chat as it is run through the Riot client and not the game process.
In-game voice chat missing from recordings
This issue is usually related to how the game handles in-game chat audio.
In some games, the in-game chat runs under a separate process from the main game itself. Outplayed’s Capture Modes are designed to record only the game process, so any audio coming from a different process (such as in-game voice chat) may not be detected or recorded.
Unfortunately, we’re not able to change how individual games manage their internal processes.
You can try one of the following alternatives:
- Use Discord for voice chat- Discord audio is usually detected and recorded automatically by Outplayed, making it a reliable alternative for capturing voice chat.
- Use the Screen Recorder feature- The Screen Recorder captures the entire screen, not just the game process. This allows audio from additional processes, including in-game chat, to be recorded as well.
Audio not playing when viewed outside of Outplayed
Outplayed records your audio on different tracks/channels. For example:
Track 1- Game sound
Track 2- Microphone
If you can't hear a part of the clip audio when viewing the recording outside of the Outplayed player this is most likely an issue with the media player selecting the wrong track/channel. We recommend trying a different media player, such as VLC media player, and checking if the issue continues.
If viewing the clip in a different media player does not resolve the issue please try the troubleshooting steps in the Common Capture Issues.
How to force microphone capture to mono
If you are using an XLR microphone or any microphone that captures only one side you can set Outplayed to mono sound capture under the advanced options in the Outplayed Capture settings:

How to set up Wave Link Stream (Elgato Wave) in Outplayed
Under the Outplayed Capture settings go to the Audio section and select the microphone device "Wave Link Stream (Elgato Virtual Audio)". Please make sure to leave "Capture System Sound" disabled.
Then fully relaunch Outplayed & your game to save these settings:

What is the Game dashboard (Secondary screen) and how to disable it
The Game dashboard is an in-game secondary screen with additional real time information about your recording and game such as: time played, game service status, used storage/total storage & capture settings (Capture mode, resolution, bitrate & FPS). You can also click on the hotkeys to directly trigger actions like saving a replay.
The Game dashboard in portrait mode:

The Game dashboard in landscape mode:

You can switch between portrait and landscape mode in the Outplayed game settings:

The Game dashboard will only appear while the game process is running. You can show/hide the Game dashboard by clicking on your set hotkeys. These will appear on the top of the Game dashboard and can be changed in Outplayed game settings:

You can enable/disable the Game dashboard by clicking on your game in the Outplayed settings and toggling the Game dashboard option on/off:

The Games dashboard is not resizable and will be sized based on app orientation. Additionally, it is automatically disabled for games with no in-game overlay support.
What is Captured Events notification and how to disable it
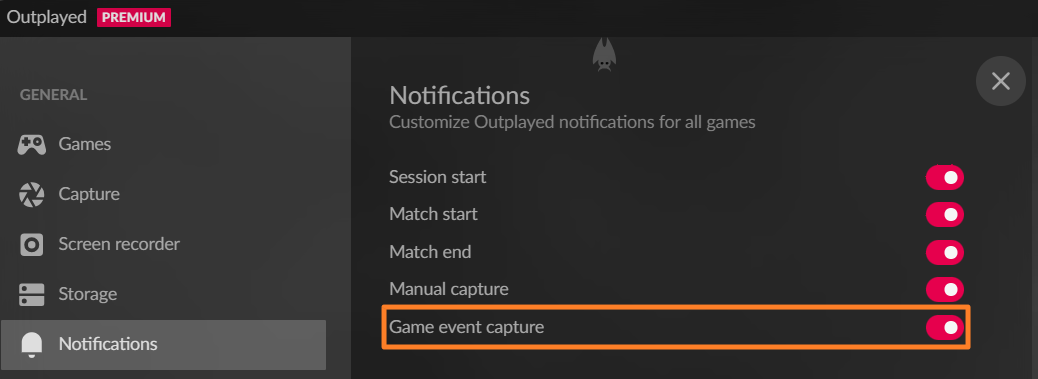
Captured Events notifications let you know when key moments happen in-game like kills, headshots, or deaths.
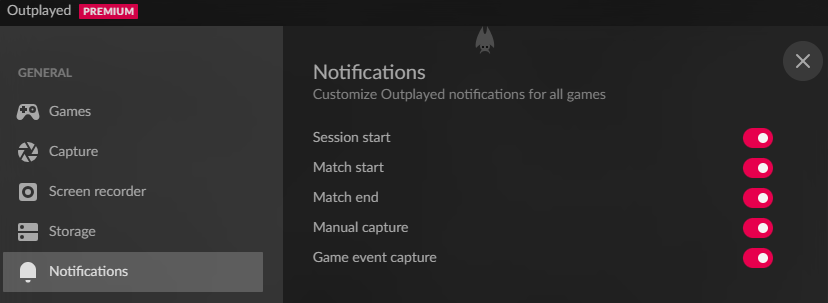
You can disable this setting under the Notifications tab:
What is Discord rich presence and how to disable it
The Discord rich presence allows your friends on Discord to see when you are using Outplayed:

This helps us grow and keep Outplayed free to use :)
You can always disable this setting under the Capture settings in Outplayed:

Make sure to relaunch Outplayed to save the setting.
What are “Before duration” and “After duration”
The "before duration" is the amount of time Outplayed will record before pressing on the record hotkey. For example, if your before duration is 20 seconds once you press on your hotkey to record Outplayed will record for 20 seconds from before you press on the hotkey. Same goes for after duration, it will continue recording for the amount of time after pressing on the record hotkey.

For example, if you click on record 1 minute into your game the recording will start from 0:40 not 1:00 when you click on the hotkey.
Once you have changed this setting you can click on "Apply globally to all games" if you would like all your games recorded with Outplayed to use the same “Before duration” and “After duration”:

When using the Full Session/Full Match Capture Modes the before duration setting refers to placing the bookmark.
How to change the duration of your highlights
When selecting the Highlights Capture Mode you can set how long before and after each game event you would like each highlight to be captured for. It is possible to set the highlight to be captured for a maximum of 180 seconds before & after each game event.
Note: When your game is set to record the Full Session/Full Match these settings can be used to change the length of the bookmark instead of the recording.
You can change this setting by clicking on your game under the Games tab, clicking on Advanced Options and toggling the bars next to each event type:

For example: In the gif above the settings for the Victory event have been changed so the highlight recorded by Outplayed will show 93 seconds before the Victory event takes place and 92 seconds after the event as well.
Please make sure to restart Outplayed and your game to save any changes to these settings.
What is a bookmark?
Just like bookmarks in real life, creating a bookmark in Outplayed allows you to go back to the point you marked in the video.
Bookmarks are represented by an icon on the timeline. Each bookmark also has a start time and duration, clicking on the bookmark will play the segment.
Outplayed will automatically mark game events on the timeline:

Manual capture has a unique bookmark that will be added to the clip on the moment you hit the hotkey:

When Outplayed automatically captures the game, pressing the manual capture hotkeys will add a manual bookmark to the clip, allowing you to find that moment easily on the timeline.
How to change the recording names
Note: Changing the recording file name directly can disconnect the clip from Outplayed. Use the steps here to reconnect the clip.
You can change the recording name by clicking on the current name and then typing in what you would like to name the clip:

Where to find the video files
You can find the original recording files by going to the Outplayed settings and clicking on Storage:

You can also find a specific video file by clicking on the Open Folder button over the clip:

Please note that moving or editing these files will remove them from Outplayed. If you would like to edit these files we recommend making a copy of the original file.
How to Backup and Restore your Outplayed recordings
Note: Do not start a new game process/recording while backing up or restoring.
If you are planning on making any changes to your computer or to Outplayed (such as uninstalling and reinstalling the app), you can create a backup of all your recording sessions on Outplayed and then restore them at a later date.
Please note that the backup and restore options are disabled while in-game.
Currently we can only backup the recording sessions and settings, but we’re working on adding an option to backup your editor projects as well!
Creating a backup
Click on the Backup and Restore option in the Help Center

Select Backup

Choose the destination folder that the backup file will be saved to. You can change the destination if needed.
Make sure that the destination folder has enough space for the backup file!Click on Create Backup
Make sure to keep your backup file safe! Without the file it will not be possible to restore the data.
Restoring from a backup
Note: Restored backups are added to the existing data, and may overwrite it. This can not be undone!
To restore your files from a backup file follow these steps:

Click on the Backup and Restore option in the Help Center

Or from the first installation screen

Select the Restore tab
Choose the media folder for your restored data, keep the current folder if you want to add data, or choose a new one for a clean start (If your current video locations are spread over various folders the restore process will tidy it up.)
Click on “Browse” and select your .obp backup file
Click on Restore backup
Once the backup is completed it will show as restored successfully
Relaunch Outplayed to complete the restoration
Please make sure to wait until the backup restore is completed before making any changes to the data such as using the screen recorder, generating clips, exporting videos, and any other actions that will add or remove data.
If the backup file has been corrupted or deleted but you still have the recording files themselves you can import the recordings into Outplayed using these steps.
How to set up the Media folder
When setting up Outplayed you will need to select the Media folder which will be used to store all your recordings with Outplayed:

The default path is set to C:\Users\[Your username]\Videos\Overwolf\Outplayed and is the recommended setting.
This subfolder will be automatically created by Outplayed after your first recording.
If the folder isn't created please make sure that Outplayed is not being blocked.
You can set the Media folder to a different location on the computer however we recommend keeping the location on the C drive. Assigning it to a different drive or OneDrive may cause the recordings to be disconnected and deleted from Outplayed if the non-C drivers disconnects at any point.
If your clips are disconnected but the recording files are still on the computer you can reconnect them using the steps here.
How to change the Media folder location
Please note that moving or editing the recording files directly will remove them from Outplayed.
If you would like to change the Outplayed Media folder at any point please follow these steps:
1. Create a backup of your recording files using the steps from- How to Backup and Restore your Outplayed recordings.
2. Restore the backup folder directly to the new Media folder:

Please note that if you have changed the storage folder location before creating a backup the recording files may be disconnected/deleted from Outplayed.
If the recording files have disconnected from Outplayed you can reconnect them using this guide: How to locate and reconnect clips
If the files have been deleted from Outplayed but you still have a copy of the recordings you can import them into Outplayed using this guide: How to import external clips into Outplayed
We do not recommend using an external driver as the Media folder.
What are the recommended recording settings?
As each computer is different we recommend trying one of the following preset settings in Outplayed:

You can also select the Custom option to manually adjust resolution, bitrate, and FPS. For best results, we recommend using the custom values outlined in the Minimum Recording Requirements & Recommended Settings article.

Note: We recommend keeping the resolution on Source when using the Custom mode.
Make sure to relaunch Outplayed & your game to save the settings.
Minimum recording requirements
Click here for the minimum recording requirements & recommended settings
Encoders supported by Outplayed
Click here to view the video codec selection and availability.
How to delete clips
Please note that deleting clips by making changes/deleting the original recording file from the computer and not from the Outplayed app may cause issues in Outplayed.
You can delete a clip by going to the Sessions tab and selecting one or more of the clips then clicking on "Delete items"
You can restore recently deleted clips using the steps Here.
If the clip has been marked as Favorite please go to the Favorites tab (Sessions > Collections) to delete the clip.
How to restore recently deleted clips
If you're running Outplayed version 174.0.12349 or above, you can restore manually deleted clips from the Recently Deleted tab in Outplayed.
Once you have selected the clips you can either click Confirm to restore it or Delete Items to permanently delete it:

By default, clips are kept for 3 calendar days and are permanently removed at 23:59 UTC at the end of the final day. For example, if a clip is deleted on the 1st of the month, it will be permanently removed on the 3rd at 23:59 UTC.
You can customize how many days clips are kept before final deletion in your Outplayed Storage settings:

A couple of things to keep in mind:
- Changes to settings apply to future deletions only. Clips that have already been deleted will follow the setting that was active at the time they were deleted.
- Clips in Recently Deleted do not count toward your storage quota.
- Only clips that were manually deleted can be restored. If a clip wasn't recorded at all, recorded incorrectly, or was corrupted, we aren't able to restore or fix it retroactively.
If you're running into recording issues, please try the troubleshooting steps here: Common Video Capture Issues.
You can always create a backup of your current recordings using the guide here: How to Backup and Restore your Outplayed recordings
How to stop Outplayed recording a certain game
You can stop Outplayed from recording a certain game using these options:
1. Go to the Outplayed setting, hover over the game name under MY GAMES and click on the X button next to its name:

2. Go to the Outplayed settings and in the Games tab find the game and click on it to disable it.
You can always enable the game again by going to the Outplayed settings and re-adding the game in the Games tab.
Help! Outplayed isn’t working
If you are encountering any issues with recording on Outplayed such as no clip being recorded, freezes/laggy clips or audio issues with the recording please try the troubleshooting steps in this article: Common Capture Issues